Whether you are a bedroom vocalist recording your first demo, a gigging musician performing on weekend stages, or a serious artist building a professional home studio, one truth holds across every level: the microphone you sing into shapes everything. It colors your tone, captures your dynamics, and either flatters or exposes your voice. Choosing the wrong microphone — even if it is expensive — can make a great voice sound mediocre. Choosing the right one can make a good voice sound extraordinary.
The problem is that the microphone market is enormous, confusing, and full of technical jargon that means little to most buyers. Condenser versus dynamic, cardioid versus omnidirectional, XLR versus USB — these terms get thrown around constantly but rarely explained in practical, human terms. That’s exactly what this guide is here to fix.
By the time you finish reading, you will know which type of microphone suits your specific use case, which features actually matter, which specs you can safely ignore, and which models deserve your attention across different budgets.
Why Your Choice of Microphone Matters More Than You Think
Many beginners assume that recording or performance quality is mostly about their voice or their instrument. In reality, the signal chain — the path your voice travels from mouth to listener — determines a huge portion of the final sound. The microphone is the very first link in that chain.
A microphone that doesn’t suit your voice frequency range will sound dull or harsh. A microphone with poor off-axis rejection will pick up room noise and reflections, muddying your recordings. A microphone with high self-noise will bury quiet, intimate passages in a constant hiss.
Choosing the right microphone is not about buying the most expensive one. It’s about matching the tool to the task — your voice type, your environment, your budget, and your use case.
Step 1: Understand the Two Main Microphone Types
Dynamic Microphones
Dynamic microphones use a moving coil inside a magnetic field to convert sound into an electrical signal. They are rugged, require no external power, handle very high sound pressure levels without distorting, and are relatively affordable.
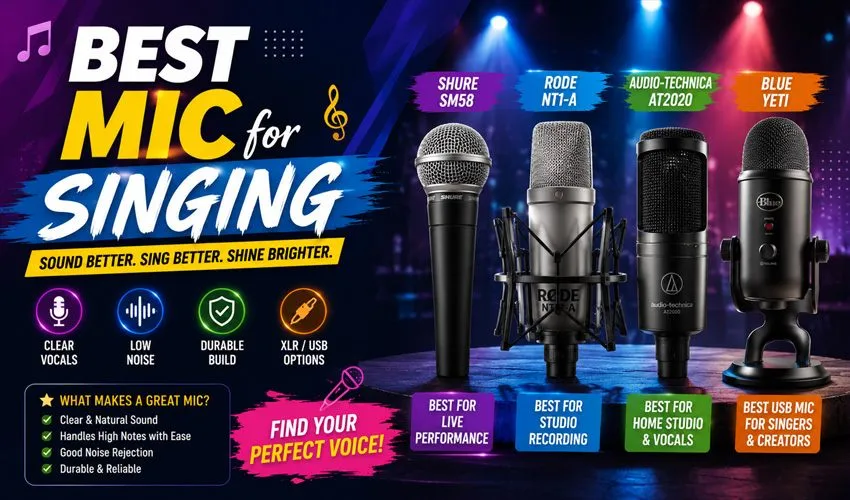
For singing, dynamic microphones shine in live performance settings. They reject background noise well, handle proximity to loud speakers on stage without feedback, and are durable enough to survive years of gigging. The legendary Shure SM58 — perhaps the most iconic vocal microphone ever made — is a dynamic mic, and it has been the go-to for live vocalists for over five decades.
Dynamic mics are also excellent for home recording in untreated rooms. Because they are less sensitive than condensers, they pick up less room noise, making them far more forgiving in acoustically imperfect spaces like bedrooms or living rooms.
Best for: Live singers, home recording in untreated rooms, beginner setups, outdoor use.
Condenser Microphones
Condenser microphones use a charged capacitor diaphragm to capture sound. They are more sensitive, more detailed, and have a wider frequency response than dynamic mics. They require phantom power (typically 48V, supplied by most audio interfaces and mixers) to operate.
For studio recording, condenser microphones are the industry standard. Their sensitivity captures the full nuance of a vocal performance — the breath before a phrase, the subtle vibrato on a held note, the room’s natural reverb. Large-diaphragm condensers in particular are celebrated for adding a flattering warmth and presence to vocals.
The tradeoff is that this sensitivity works against you in imperfect environments. A condenser microphone in an untreated room will capture every click, hum, echo, and ambient noise alongside your voice. Acoustic treatment — foam panels, reflection filters, or purpose-built recording spaces — becomes important when using condensers at home.
Best for: Studio recording, treated home studios, professional setups, detailed vocal capture.
Step 2: Know Your Polar Patterns
The polar pattern describes the directions from which a microphone picks up sound. For vocal use, the most relevant patterns are:
Cardioid — Picks up sound primarily from the front, with rejection at the sides and rear. This is the standard pattern for singing, as it isolates your voice and minimizes background noise and feedback. The vast majority of vocal microphones are cardioid.
Supercardioid / Hypercardioid — A tighter, more directional version of cardioid. Even better at rejecting side noise, useful in noisy live environments. Requires more precise mic technique since the pickup angle is narrower.
Omnidirectional — Picks up sound equally from all directions. Rarely ideal for live singing (high feedback risk) but sometimes used in controlled studio environments for a natural, spacious sound.
For most singers — live or in the studio — cardioid is the correct pattern to look for.
Step 3: XLR vs USB — Which Connection Do You Need?
This is one of the most practical decisions you’ll face.
XLR microphones connect to audio interfaces, mixers, or PA systems via a three-pin XLR cable. They are the professional standard, offering superior audio quality, lower noise, greater versatility, and compatibility with virtually any professional audio setup. If you plan to record seriously, perform live, or grow your setup over time, XLR is the right investment.
The only requirement is an audio interface (for home recording) or a mixer/PA (for live performance) to connect to. Affordable, high-quality interfaces like the Focusrite Scarlett Solo or the PreSonus AudioBox start at a reasonable price and dramatically improve recording quality.
USB microphones connect directly to a computer or tablet via USB, with no additional hardware needed. They have a built-in analog-to-digital converter, which makes them plug-and-play simple. For beginners, podcasters, streamers, and casual home singers, USB mics offer an excellent starting point without the learning curve of an interface-based setup.
The tradeoff is that USB mics offer less flexibility, lower audio quality ceiling, and can’t be used for live performance in traditional setups.
Recommendation: If you are serious about singing and plan to record properly, invest in an XLR microphone and a basic audio interface from the start. If you want simplicity and are testing the waters, a quality USB microphone is a perfectly valid entry point.
Step 4: Key Specifications That Actually Matter
Frequency Response
This describes which frequencies the microphone captures and how it emphasizes or rolls them off. For vocals, look for a microphone with a presence boost — a slight rise in the 2kHz–10kHz range that adds clarity and intelligibility to sung vocals. Most dedicated vocal microphones are voiced this way.
A flat frequency response is more suited to instrument recording or broadcast use. For singing, a gentle presence boost is typically flattering.
Self-Noise (Equivalent Input Noise)
This is the noise floor the microphone generates internally, measured in dB(A). Lower is better. For vocal recording, look for self-noise below 20 dB(A) — ideally below 15 dB(A) for quiet, intimate vocal styles. Dynamic microphones don’t have self-noise in the same way as condensers, making them naturally quiet.
Maximum SPL (Sound Pressure Level)
This indicates how loud a sound source the mic can handle before distorting. For most singers, any microphone rated above 120 dB SPL is more than adequate. This spec matters more for miking loud instruments like drums or guitar amplifiers.
Sensitivity
Higher sensitivity means the microphone captures quieter sounds more easily — useful for quiet singers or intimate recording styles. Lower sensitivity is more forgiving in noisy environments. Most dedicated vocal condensers offer good sensitivity; dynamic mics are less sensitive by nature.
Step 5: Matching the Mic to Your Voice Type
This is something most buying guides skip, and it’s one of the most important considerations.
Bright, high voices (soprano, tenor): Benefit from microphones with a warm, smooth top end that doesn’t over-emphasize already-present high frequencies. Look for condensers with a gentle high-frequency roll-off or a “vintage” voicing. Models like the Audio-Technica AT2020 or the Rode NT1 work beautifully here.
Warm, deep voices (baritone, alto, bass): Benefit from microphones that capture low-end richness without becoming muddy. Large-diaphragm condensers with extended low-frequency response excel here. The sE Electronics sE2200 and the AKG C214 are popular choices for deeper voices.
Powerful belt singers: May actually benefit from a dynamic mic or a condenser with a high SPL rating, as extreme vocal power can cause cheaper condensers to distort or compress unnaturally.
Quiet, breathy singers: Need a sensitive condenser in a treated space to capture delicate nuance. The Rode NT1A — known for exceptionally low self-noise — is a classic recommendation for this vocal style.
Microphone Recommendations by Budget
Entry Level (Under ₹5,000 / ~$60)
Samson Q2U — A dual USB/XLR dynamic microphone that gives beginners the flexibility to start simple (USB) and grow into a professional setup (XLR) without buying a new mic. Solid sound, excellent value.
Audio-Technica AT2020USB+ — A USB condenser with good clarity and a useful headphone monitoring port for zero-latency listening while recording. Excellent for home singers who want quality without an interface.
Mid Range (₹5,000–₹15,000 / $60–$180)
Rode NT1A — One of the quietest condenser microphones ever made (self-noise: 5 dB(A)). Delivers a detailed, clear, slightly bright sound that flatters most vocal types. Comes bundled with a shock mount and pop filter — outstanding value.
Audio-Technica AT2035 — A versatile large-diaphragm condenser with a warm, natural sound and a high dynamic range. Handles loud sources without distortion and sounds excellent on a wide range of voice types.
Shure SM58 — The live performance gold standard. Virtually indestructible, feedback-resistant, and voiced specifically for the human voice. Every serious live singer should own one.
Premium Range (₹15,000–₹40,000 / $180–$500)
Shure SM7B — A dynamic broadcast microphone that has crossed over into music recording in a major way. Made famous by Michael Jackson’s Thriller sessions and adopted by countless modern vocalists and podcasters alike. Requires a strong preamp to drive properly but rewards you with a rich, smooth, radio-ready vocal sound.
Rode NT1 (2023 version) — An evolution of the NT1A with even lower self-noise, improved internals, and a hybrid USB/XLR connection. One of the best microphones under $250 for home studio vocals.
sE Electronics sE2200 — A boutique-quality large-diaphragm condenser that delivers studio-grade warmth and detail. Particularly suited to deep, rich voices and professional recording environments.
Essential Accessories You Shouldn’t Overlook
A great microphone alone isn’t enough. These accessories are not optional extras — they are functional necessities:
Pop Filter: Eliminates plosive sounds (the “P” and “B” burst you hear when air hits the capsule). Essential for any recording setup. Costs a few hundred rupees and makes a significant difference to recording cleanliness.
Shock Mount: Isolates the microphone from vibrations travelling through the stand. Prevents low-frequency rumble from footsteps or desk tapping from ruining recordings. Most quality microphones include one.
Mic Stand: A sturdy boom stand keeps your microphone stable and positioned correctly. Don’t underestimate this — a wobbly, cheap stand creates noise and frustration.
Reflection Filter / Acoustic Treatment: If you are recording in an untreated room with a condenser mic, a portable reflection filter (like the sE Electronics Reflexion Filter) dramatically reduces room noise and early reflections captured by the microphone.
Audio Interface: For XLR microphones used at home, a quality interface like the Focusrite Scarlett Solo is the foundation of a good recording chain. It provides clean preamp gain, phantom power, and low-latency monitoring.
Common Mistakes Singers Make When Buying a Microphone
Buying based on price alone. The most expensive microphone is not always the best match for your voice or room. A ₹3,000 dynamic mic in a treated space can sound better than a ₹30,000 condenser in an untreated bedroom.
Ignoring room acoustics. A condenser microphone in a reflective, noisy room will capture all of that room’s problems in vivid detail. Fix your room before upgrading your microphone.
Skipping the audio interface. Plugging an XLR microphone into a cheap, noisy soundcard defeats the purpose of a quality mic. Your interface’s preamp quality matters as much as the microphone itself.
Not testing for your voice type. Read reviews from singers with similar voice types to yours. A microphone praised for bright pop vocals may be the wrong choice for a deep soul baritone.
Final Thoughts: Which Is the Best Mic for Singing?
There is no single “best” microphone for every singer in every situation. The best microphone is the one that suits your voice, your environment, your performance context, and your budget.
For live performance, the Shure SM58 remains the safest, most battle-tested recommendation on the planet. For home recording on a budget, the Rode NT1A or Audio-Technica AT2035 offer studio-quality performance at accessible prices. For broadcast-quality home recording, the Shure SM7B is unmatched in its class. For beginners who want simplicity, a quality USB condenser like the Audio-Technica AT2020USB+ removes all setup friction.
Invest in the right microphone for your specific needs, pair it with even basic acoustic treatment and a decent interface, and you will be astonished at the quality you can achieve — regardless of whether you are recording in a bedroom or a professional studio.
Your voice deserves to be heard in its best form. The right microphone makes that possible.
Prices mentioned are approximate and may vary by platform, region, and promotional periods. Always compare across official brand stores and major retailers before purchasing.